Sunday, December 16, 2012

Homemade Marshmallows


I originally found this recipe for Peppermint Marshmallows on Pinterest and followed it back to The BeanTown Baker's blog.  I've also adapted the recipe to make maple flavour marshmallows.


Ingredients:

  • 1 cup ice cold water, divided
  • 3 packets gelatin
  • 1 cup white corn syrup
  • 1 1/2 cups sugar (substitute 1 cup pure maple syrup for the maple ones)
  • 1/4 tsp salt
  • 3/4 tsp peppermint extract (omit for maple ones)
  • powdered sugar and cornstarch in equal portions
  • food colouring (optional)


Steps:
  • Add 1/2 cup cold water to mixing bowl of stand mixer and sprinkle gelatin on top, set aside

  • Bring to simmer remaining water, sugar(or maple syrup), corn syrup and salt in a small saucepan
  • Once simmering, cover with lid and cook for 4-5 minutes
  • Remove lid and continue to heat until mixture reaches 240° or hard ball stage, remove from heat

  • Turn stand mixer on to low and mix gelatin for 1 minute
  • Slowly pour hot sugar mixture down side of bowl while mixing
  • Once all the sugar mixture has been added, increas speed to high
  • Allow to mix for approx. 15 minutes, till it cools and almost triples in volume
  • While mixing, prepare 9x13 pan - lightly oil the pan and dust with powdered sugar/cornstarch mixture
  • When ready, pour mixture into prepared pan, smooth top with oiled offset spatula
  • Dust top of marshmallows with powdered sugar/cornstarch mixture
  • Leave to dry for a minimun of 4 hours, or preferably overnight
  • Turn out onto dusted cutting board
  • Cut into 1 inch squares (a pizza wheel works best)
  • Toss each square into the powdered sugar/cornstarch mixture to coat sticky sides, brushing off any excess


Store in airtight container for up to 3 weeks

Saturday, December 15, 2012

Pate Chinois

This is one of the 4 recipes that I presented to the Daring Kitchen cooks for the December 2012 Challenge. You can check out the full file with all the how-to pictures here:  Paté Chinois

This is a slight variation on the version my Mom always made when I was growing up.  I've add a few more flavours, and of course some onions.


Ingredients:

  • 2 ½ lbs (1 kg) lean ground (minced) beef
  • 2 onions diced
  • 1 clove garlic minced
  • 1¾ cups (115 gm) (4 oz) mushrooms diced
  • ½ teaspoon (2 gm) dry mustard powder
  • 2 teaspoons (8 gm) prepared horseradish
  • ½ cup (120 ml) red wine (optional)
  • salt and pepper
  • 19 oz (550 gm) can of cream corn
  • 2 ½ lbs (1 kg) potatoes
  • ½ cup (120 ml) milk
  • ¼ cup (55 gm) (2 oz) butter


Steps:
  1. Pre-heat oven to moderate 350°F/180°C/gas mark 4. 
  2. Wash potatoes and cut into quarters 
  3. Boil potatoes until tender. Drain.
  4. Mash potatoes with butter and milk. 
  5. Set aside. 
  6. In frying pan, brown ground beef with onions, garlic and mushrooms. 
  7. Season with horse radish, mustard powder and optional red wine. 
  8. Add salt and pepper to taste.
  9.  Cook until well done and no pink remains. 
  10. Evenly spread ground beef on the bottom of an oven proof casserole dish. 
  11. Top with cream corn. 
  12. Spread mashed potatoes on top. 
  13. Use a fork to make drag marks through the potatoes for decoration. 
  14. Bake in oven for 15 minutes until heated through.
  15.  Place under broiler (grill) for 2-3 minutes to brown up potatoes. 
  16. Serve and enjoy


Tuesday, December 11, 2012

Homemade Cream Cheese Mints

I came across this recipe on Pinterest.  You can check out the blog I got it from here:  Kelley Highway: Homemade Cream Cheese Mints

These candies were very easy to make and really quite yummy.  You may think that the sugar will never incorporate into the small amount of cream cheese that you use, but carry on, it really does.


Ingredients:

  • 3 oz cream cheese
  • 3 cups sifted icing sugar
  • 1 tsp peppermint extract
  • Food colouring (optional)


Steps:
  1. Blend cream cheese and mint extract with electric mixer. If using food colouring, add now.
  2. Sift and add sugar slowly, mixing well between each addition.
  3. When mixture gets too stiff to use electric mixer, mix by hand.
  4. Using melon baller, scoop small amount of dough and roll into small, cherry size ball,
  5. Place on parchement lined cookie sheet, sprinkled with powdered sugar
  6. Flatten each cirlce with the back of a fork,
  7. Let dry overnight, turning each candy occasionally so that it dries thouroughly.
  8. Store in parchment lined tin for up to 3 weeks.


Sunday, December 2, 2012

Brie A La Chume

We are not really sure where this name came from, as a quick Google search did not turn up any other recipes by this name.  Hilary recalls having it at the Bloor St. Diner in Toronto, so maybe they can have credit for the name. (Though it's not currently on their menu)


Ingredients:

  • 1-2 Granny Smith Apples
  • Brie (as much or as little as you like)
  • Garlic powder to taste
  • Mini pitas or cut up baguette to serve with


Steps:
  1. Core and cut up apples into wedges
  2. Cut up Brie into small cubes, include the rind
  3. Intersperse apple wedges and brie in an oven proof dish, sprinkling with garlic powder as you go
  4. Bake in 400 ° oven till heated through and cheese is melted, approx 15 minutes
  5. Serve immediately


Saturday, November 17, 2012

Hummus

In an effort to add more protein to my diet, we have started making hummus each week.  I eat it for breakfast with my vegetables.  I have not listed quantities for the ingredients as this is very much by taste.  Each week it tastes difference - heavy garlic one week, strong lemon flavour the next.  All of them are good though.


Ingredients:

  • Chickpeas
  • Garlic (fresh or powdered)
  • Cayenne Pepper
  • Tahini
  • Lemon Juice
  • Olive Oil
  • Water (if needed)


Steps:
  1. Soak the chickpeas in cool water over night
  2. Cook the chickpeas in water until tender, approx 1 hour (if you don't pre-soak them, cook for approx 2.5 hours),drain well and cool to room temperature (can also be cooked the day before and kept in the fridge)
  3. Add all ingredients to food processor
  4. Blend until well mixed and desired consistency
  5. If it's to thick and dry, add water, 1 Tbsp at a time


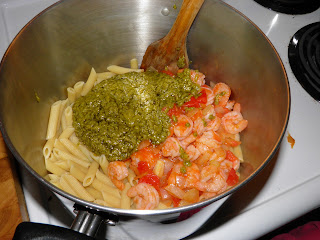
Pesto Shrimp Pasta


This is one of our favorite, quick go-to meals.  We generally have all the ingredients on hand an it only takes as long to make as it takes to boil the pasta.


Ingredients:

  • 1 lb (450 g) of dry penné
  • 340 g raw, unpeeled shrimp
  • 270 ml Basil Pesto
  • 2 onions
  • 3-4 tomatoes


Steps:
  • Cook penné according to directions, drain
  • Drain off oil from the pesto into a frying pan
  • Sauté onions till tender
  • Add tomatoes and cook for 2-3 minutes, stirring constantly
  • Add shrimp and continue to stir until cooked through and completely pink, about 3-4 minutes

  • Add pesto and shrimp mixture to drained pasta

  • Toss well and serve

Sunday, November 11, 2012

Cheese Souflé

I decided that I wanted to learn to make a cheese souflé. I read over many different recipes and decided to follow Alton Brown's from the Food Network.

Souflés are very impressive looking, light and airy and tasty.  They also seem very intimidating.  Turns out, they aren't that hard.  Make a basic Béchmel sauce, add cheese, egg yolks and flavouring and fold in whipped egg whites. Pour into buttered ramikins and bake.  The hard part is folding in your egg whites, making sure you get it well incorporated without losing the volume.

For these cheese souflés I used a sharp old cheddar and chives, with some dry mustard and garlic in the Béchmel sauce.  They rose nice and high and browned well.  They did fall almost as soon as they came out of the oven, but they were very light and fluffy on the inside.

I'm glad to have conquered cheese souflés.  Next I would like to try a desert version.


Sunday, November 4, 2012

Cleaning a Pomegranate

It used to be that every time I cleaned a pomegranate that it would look like a murder had occurred in our kitchen, complete with arterial spray on the ceiling.  I have embraced the following technique that guarantees no blood splatter on your cupboards and that your hands and clothing won't be stained for days either.


  • Cut a small slice off the top and bottom of the pomegranate.  Be careful not to cut too deep as you will hit the seeds.


  • Score the all around the outside of the pomegranate, about the size of orange sections.


  • Put the pomegranate in a bowl of water and cut out the center core.


  • Separate all the scored sections.

  • Using your thumbs, delicately separate the seeds from the pulp.  The seeds will sink to the bottom and the pulp will rise to the top making it easy for you to discard.  Swishing the seeds around with hands will help to remove any bits of pulp that remain.  Drain well.

  • Enjoy!
 

Sunday, September 9, 2012

Mushroom Risotto

Risotto has been on my "bucket" list of things to cook ever since I've watched it being made in Hell's Kitchen.  It gets sent back more often then it gets served there, so I thought, just how hard is this recipe to do?  Maybe to Chef Ramsey's standards it might be hard, but my first attempt turned out creamy, well cooked and delicious!

I didn't follow any one recipe.  I read over the Joy of Cooking's basic Risotto, a recipe on AllRecipes and Jamie Oliver's Grilled Mushroom Risotto.  And then I set about to cooking.   Luckily Hilary was on hand because I completely forgot about adding in cheese at the very end.  She graciously grated it for me while I continued to stir.


Ingredients:

  • 1 cup mixed dry mushrooms
  • 8 oz fresh mushrooms, sliced
  • 2 cups arborio rice
  • 8 cups chicken stock, kept warm
  • 4-5 shallots, diced
  • 1/2 cup butter
  • 1/2 cup white wine
  • 1 cup finely grated Parmesan cheese


Steps:
  1. Soak dry mushrooms in warm water till soft.  Drain mushrooms, reserving liquid.  Cut mushrooms into small pieces.
  2. Sauté fresh mushrooms in some butter till well cooked.  Set aside, including all liquid.
  3. Sauté dried mushrooms for 2-3 minutes.  Add to fresh mushrooms
  4. Sauté shallots in remaining butter on low heat for 5-6 minutes.  Do not allow them to brown.
  5. Add uncooked rice.  Continue to sauté for 5-6 more minutes, until rice starts to appear translucent.
  6. Add reserved liquid from soaking the mushrooms.  Continue to stir till all liquid is absorbed.
  7. Add white wine.  Continue to stir till all liquid is absorbed.
  8. Add stock, 1/2 cup at a time, stirring constantly.  As each 1/2 cup of liquid is absorbed, add more.   The rice will cook during this time and your risotto will develop a nice creamy texture.
  9. This should take about 25 minutes, but check the doneness of the rice periodically.  I did not need all 8 cups of stock before my rice was done.
  10. Add the mushrooms back into the rice just before it is completely cooked.
  11. Once the rice is done add in the Parmesan and stir well
  12. Serve.

Monday, September 3, 2012

Tres Leche Cake


Ingredients:

  • 3 whole eggs
  • 3 egg yolks
  • 3/4 cup sugar
  • salt
  • 1 tsp vanilla
  • 1/2 cup masa harina
  • 1/4 cup fine cornmeal
  • 14 oz can sweetened condensed milk
  • 12 oz can evaporated milk
  • 1 cup half and half cream
  • 1/2 pt whipping cream
  • 1/4 cup powdered sugar
  • 1 tsp vanilla

Steps:
  1. Setup a double boiler by filling a pot large enough to hold your mixer bowl and bring the water to a simmer. Move your oven rack to the middle position and preheat to 350 degrees F. 
  2. Grease and flour a 9″ cake pan to prevent the finished cake from sticking.
  3. Put the whole eggs, yolks, sugar, salt, and vanilla in a metal mixer bowl and whisk to combine. Put the bowl in your double boiler and whisk, heating until the mixture reaches 100 degrees F (luke warm).
  4. Mount the bowl on the mixer and beat with the whisk attachment for at least 5 minutes. It may look ready before then, but it really needs to go this long to get enough air integrated. The volume will triple and pale yellow ribbons of egg will flow off the whisk
  5. Sift the masa harina and cornmeal into a bowl though a fine double mesh strainer. 
  6. When the egg mixture is ready, add 1/3 of the flour mixture into the eggs and fold together. Repeat twice more, folding between each addition until you can’t see any more clumps of flour.  Be gentle while folding though as it will not rise properly if the egg mixture deflates. 
  7. Pour the batter into the prepared cake pan and bake until a skewer comes out clean (about 20-25 minutes). 
  8. Put the cake pan on a rack and allow to cool.
  9. To make the tres leches syrup, just whisk the three ingredients together in a bowl. You only need half the mixture, so you can either double the batter and make 2 cakes, or you can store the extra syrup in a sealed container for the next cake you make.
  10. Use a toothpick to poke holes all over the cake, this will help the cake absorb the tres leches syrup. 
  11. When the cake cools to room temperature, pour half the syrup mixture over the cake, making sure to evenly saturate the edges. 
  12. Cover and refrigerate overnight.
  13. For the whipped cream, put the cream, sugar and vanilla in the bowl of an electric mixer fitted with the whisk attachment. 
  14. Beat until you see peaks form in the cream. 
  15. Spread the whipped cream evenly over the top of the cake. 
  16. Slice and serve with fruit.

Recipe source:  http://norecipes.com/blog/pastel-de-tres-leches/

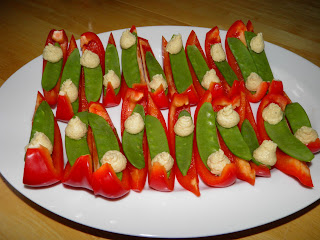
Hummus and red pepper


Ingredients:
  • Red Pepper
  • Snow Peas
  • Hummus (no measurements, this one is all done to taste - some like a lot of garlic, others more lemon, just keep tasting and adding till you like it)
    • Chickpeas
    • Lemon juice
    • Tahini
    • Garlic
    • Salt, pepper, cayenne 
    • Olive oil


Steps:
  1. Boil chickpeas until tender; drain and cool
  2. In food processor mix chickpeas, garlic, lemon juice, tahini until well blended
  3. While mixing, drizzle in olive oil until it reaches your desired consistency.  If it become to thick and pasty, you can add some water, a few drops at a time
  4. Season with salt, pepper and cayenne to taste.
  5. Fill pipping bag with hummus
  6. Layout slice of red pepper with a snow pea on top and pipe a dollop of hummus on top.


Watermelon bites


Ingredients:

  • Watermelon
  • Mint Leaves
  • Balsamic Reduction


Steps:
  1. Boil 1 full bottle of balsamic vinegar until reduced to a thick syrup.  If desired you can add some sugar to taste.  Watch it carefully as it will burn quickly when it starts to thicken.
  2. Cool reduction 
  3. Cube watermelon into 1 inch squares
  4. Using a melonballer,  scoop out a small bit of the top of the square, being careful to not make the wall too thin, or the balsamic reduction will leak through
  5. Add a small amount of cooled reduction to each melon square
  6. Top with mint leaf
  7. Serve.


Sunday, September 2, 2012

Easy Blondies

What can be easier then a desert that only has 3 ingredients and only takes 30 minutes to make?


Ingredients:

  • 1 whole box of Ritz crackers
  • 1 can sweetened condensed milk
  • 1 package Skor bits


Steps:
  1. Crush the crackers into crumbs ( I used the food processor, much faster)
  2. Combine the crumbs with the sweetened condensed milk and the Skor bits - keep back 1/4 cup to sprinkle on top.
  3. Spread into a buttered 8x9 baking dish
  4. Sprinkle extra Skor bits all over
  5. Bake at 350° for 20 minutes*
  6. Cool, cut into squares and serve


*I think next time I would have baked them a bit longer.  They were very good, but slightly undercooked.


Wednesday, August 8, 2012

Shrimp and quinoa


Ingredients:


  • 1/4 cup quinoa
  • 1/2 cup bouillon ( I like clam, but chicken works too)
  • 8 large shrimp, peeled and deveined
  • 1/2 small zucchini, diced
  • 1/2 red pepper, diced
  • 1 tbsp balsamic vinegar
  • 1/2 tbsp olive oil
  • Squirt of lime juice

Steps:

Boil the quinoa in the the chicken broth.  Set aside to cool.
Heat a fry pan, add lime juice and shrimp and cook until shrimp is pink and done.
Mix vegetables, olive oil and vinegar with quinoa.
Top with warm shrimp.
Serve.


The best part of this recipe is that it is only 255 calories and is filling enough to be a full meal on it's own.

Calories : 255
Fat: 10g
Protein: 14g
Carbs: 28g
Iron: 20g
Calcium: 6g


This recipe is linked back to Cook & Tell at Shrinkingktichen.com

Cook & Tell Recipe Link-Up from The Shrinking Kitchen

Sunday, May 6, 2012

Is it toffee, dulce leche or pudding?

No matter what you call it, you'll like it!

Start with a can of sweetened condensed milk.  DO NOT OPEN it.


Peel the label off, submerse in water and boil for 3-4 hours.  Keep adding water to ensure the can is always immersed.  The longer you boil it the thicker your treat will be.   I cooked this one for 4 hours and it was very thick.

Let the can cool till you can handle it.  In hindsight a can that needs a can opener would have been easier to open the one with a key that you pull open.

Enjoy!  With a spoon or in another recipe.  I think it would be divine on French toast.

I was skeptical  that this was going to work, and I have no idea how it works, but this is something that we will definitely try again!

Friday, March 16, 2012

Coconut Red-Lentil Curry

 
Ingredients:


  • 1 medium onion, finely chopped
  • 2 tablespoons vegetable oil
  • 1 tablespoon finely chopped peeled fresh ginger
  • 2 garlic cloves, finely chopped
  • 1 teaspoon ground cumin
  • 1/2 teaspoon ground coriander
  • 1 teaspoon turmeric
  • 1 teaspoon salt
  • 1 (2 1/2 inch) fresh jalapeno or serrano chile, finely chopped, including seeds
  • 2 cups water
  • 1 1/2 cups dried red lentils
  • 1 (14 oz) can unsweetened coconut milk
  • 1 lb zucchini, cut into 1/4-inch dice
  • 1 cup loosely packed fresh cilantro (optional)

Steps:

Cook onion in oil in heavy pot over moderate heat, stirring occasionally, until edges are golden, about 6 minutes.

Add ginger and garlic and cook, stirring, 1 minute.

Add cumin, coriander, turmeric, salt and chile and cook, stirring 1 minute.

Stir in water, lentils and coconut milk, then simmer, covered, stirring occasionally, 5 minutes.

Stir in zucchini and simmer, covered, until lentils and zucchini are tender, about 15 minutes.

Season with salt and pepper and serve with cilantro sprigs scattered on top.

Serve with rice or naan.


Source:  Touchet, Alexis. "Quick Kitchen." Gourmet, December 2006: 181


Thursday, January 5, 2012

Salmon smoked with tea

This recipe came from my November Daring Kitchen Challenge.

We drink a lot of tea.  While we have favorites (Chai and Vanilla Earl Gray) we also have a lot of variety in our cupboard.  Some days just call out for a certain tea flavour. Even Liam enjoys a nice cup of Rooibos tea before bed.

I was intrigued by this challenge.  I knew very little about cooking with tea.  Hilary had made a Chana Masala dish some time ago where she soaked the chickpeas in chai tea to flavour them before cooking, but that was the only savoury dish made with tea that I think I've ever had.

Sarah from Simply Cooked provided us with 3 recipes but I decided to do some research on my own before committing to anything.  That is how I came across the recipe for "Tea Smoked Salmon with Wasabi Latkes" on the Food Network website.  Since one of the reasons I joined The Daring Kitchen was to push myself in the kitchen, I decided to try it for 3 reasons: 1) it had tea; 2) I don't really like salmon and had never cooked it before and 3) smoking was a new cooking technique that I figured would challenge me even further.

First things first, I had to get some tea.  The recipe called for either Oolong or Black Lychee.  We may have a lot of variety in our tea cupboard, but we didn't have either of these.  Hilary enjoys Oolong, but I find it too strong and smoky for my taste.  Luckily our local mall has a newly opened tea shop, so I was able to go and sniff a few options before I settled on High Mountain Oolong.


The next step was to marinade the salmon.  It's a mixture of mirin, sugar, ginger and peppercorns.


Then I mixed the tea with sugar and rice. 

The recipe said to line the bottom of your pot with tin foil before placing this mixture in.  I almost skipped this step.... good thing I didn't! The sugar caramelized/burnt and the whole mixture was one solid mass by the end.  The only way to get it out of the pot was to lift out the tin foil.


While the salmon was smoking, I made the potato latkes.  It involved mashed potatoes mixed with green onions, horse radish and wasabi that were formed into patties, dredged in flour, dipped in egg and then coated in Panko bread crumbs.

The recipe then called for deep frying them, but I simply pan fried them in a deep skillet.

The end result:
Even I liked the salmon! I was worried at first because when I took the salmon out of the pot the escaping smell of smoked tea was overwhelming in the kitchen.  I thought that if the fish tasted anything like the smell that I wouldn't like it.  But the taste was much more subtle.  You could still taste the tea, but it did not over power the salmon.  The latkes were amazing, and I think they will become part of our regular rotation of potato options. They were even good cold the next day.

I'm feeling much more comfortable in the kitchen these days.  Thanks Daring Kitchen!!